
BABY-LIGHTS or Ribbons of LIGHT
 Application & Kit!

I feel everyone should take a look at this version of "Slices" so you understand what a SLICE is compared to a HIGHLIGHT !
Now, the way they are done in this DEMO is not how I would suggest doing them. I wanted to show an exaggerated version to show you the 'technique'. they are too light on too dark of hair, but please this is trying to show you how they lay differently than highlights and hopefully you can see how simple they are to add a few thin ones to your own hair.
Now, in Jenifer Anniston's hair, she has dozens of these only much thinner and using a multiple of colors.In her hair or for that look you would use
FOR EXAMPLE:
- ILLUMINA 8/69 + 40Volume
- Koleston Perfect 10/16 + 40 volume
- Framesi US/A + Booster + 40 Volume
- Blondor Cream Lightener + 10 Volume
Babylights - DEMO
6 FOILS + BLEACH = using SLICES




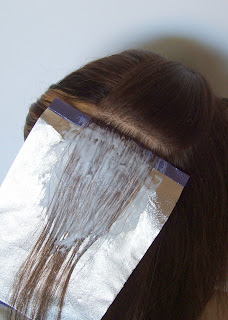
Notice, where I place the foil and where i begin to paint the creme bleach...Do not put the lightener ON the fold - - - and why do I do this? I learned my lesson, all bleaches and all hair colors ...."swell" when they are processing, which means they grow and the last thing Notice you want is the bleach leaking out of the end ...as it will make FUGLY spots on the hair that you will not like .... so be very careful how far "in' you put the color.




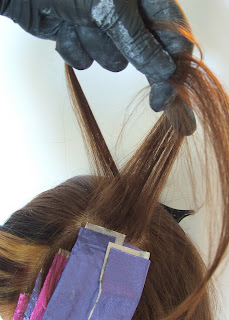


>> Take the foils out, and rinse completely untill all traces of the bleach are gone....
>> Lightly shampoo with SLS-Free Shampoo -- Rinse -- towel dry hair....The method of

You can change it , I just wanted to point out what I was doing. See how its brown next to my face then - - next to that - - there is a blond slice? I think it looks too fake to have the blond right on the face.
In my opinion ( remember this is just me) I don't like the stripey look, but if I was to blend the colors you would not see how the color in the foils came out. Now if you used various colors, and a couple more foils you would have the colors of someone named "ANNISTON" !
Here is the side I wanted you to see the "6" Slices . . . see the tiny one - - in the back which is why you do not need to do the back of your hair, it is taken care of with the front parting - - how perfect is that? ?!?
I did the same thing they do in all the big magazines. . . I did the blow dry all cool when I had the hair color I liked!
"Isn't it weird and cool all at the same time how much difference I made with just 6 foils! Its not highlights and KILLER CHEMIST says she is not exactly fond of this technique ( using just 1 color) either but I think it rocks . . ."


We will call her Holly for the sake of discussion
Holly needs to deal with how much gas costs, and the fact that she lives in a town that has no good Colorists. She is tired of the brown hair and now has Killer Strands to help. She saw, that the professional Creme Bleach in the Killerstrands Store was the trick to not damaging her hair... there are conditioners and lipids added to creme bleach - she read, which sounds a lot more forgiving...added to that the moisturizers and conditioners that will come with the developer that comes with. This way my hair will be in the best condition possible when done. I can do it............. it cannot be that hard.

We will only be doing the one side of the head as we did the other side with another Demo a while ago.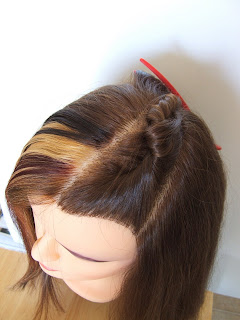

I tried very hard to make this parting look exactly like a piece of apple pie, that should be your trick. She told me to make sure I parted the triangle all the way to the very back of my head and in the exact middle. That way I can put one of my slices of light in the back, on both sides, . . . . it will be in the back of my head and I should be able to do it myself with my rear-view mirror's I have set up on my walls. I've tried it once before and it worked pretty easy. The piece in the back is really skinny so its easy.

This is the Creme bleach lightener - I bought and saw on Killerstrands Color Clinic I want to do all I can to protect my hair and its condition, I have been pretty bad to my hair in the past couple years.......... I need to make up for that (ssh!)

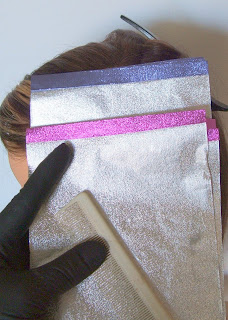
OK - here are the foils I bought too, I didn't care about the color, I cared about the fact that they were embossed and that made them not slip and being as I don't know what I am doing I wanted to take away "that" from the difficulty of doing foils for me. You can ask for a few foils when you buy the Creme Bleach. They were so much easier to use than most. Now, you absolutely MUST make the edge that I am showing you. Fold it once and then again....a very thin fold as you can see... that fold helps the color from leaking out.

The very first parting needs to be made to part OFF the hair surrounding the face so that it is left out. Leaving it the color the hair is , in my case I wanted it to be brown so I didn't have a weird light blond stripe right against my face. That would look funny I thought, when you see me at the end you can decide.

See how super thin the very first slice of hair I take is??? I had a hard time taking the picture and showing you at the same time but I think you can see. Its less than 1/8 of an inch ! I place that first foil very close to the slice of hair, notice that so when you do it you will do it the same. I had bought a mannequin and practiced on her for a while, it was fun so... I didn't care -- I wish they would have taught us this when we were in high school.
Remember when we had HOME EC.? I think we should have sewing, cooking and hair color. Why Not I wonder? More people I know would rather color their hair, than cook.
Maybe it should be the other way around. . . >>............but it isn't !

Notice, where I place the foil and where i begin to paint the creme bleach...Do not put the lightener ON the fold - - - and why do I do this? I learned my lesson, all bleaches and all hair colors ...."swell" when they are processing, which means they grow and the last thing Notice you want is the bleach leaking out of the end ...as it will make FUGLY spots on the hair that you will not like .... so be very careful how far "in' you put the color.

This is too close - I wanted you to see what is too close....just a tiny bit on the right side> see it??...so I took the foil off and re-did it...but I didn't photograph the re-do . . .
Just be aware that happens ...
if its too close to the fold then re-do it....but that's a lot harder to maneuver so try very hard to be very careful at the fold.

Finally I have the first foil done and am closing it up. Fold it in half - - first. Then fold the sides in....

Now am leaving "that much" of the hair OUT OF THE FOIL >>>> about 3/4 " so there is some of the brown in between each foil . One of the biggest problems I see is Stylists who just won't leave the natural color out of the foils.... so there is variation. Again this is an exaggerated version.

The same very thin parting. . . which is the "SLICE" of hair...appropriately named once I figured out what I was doing.

The same pattern is repeated basically all the way up this side of the hair. Now something she taught me that I did not pick up on myself... when I am using bleach, I can time it so it all ends up 'done' at the same time. Like here for example... if you are not fast, mix one small amount of bleach for this side....and mixed the creme bleach with 20 Volume { another good part of ordering from Killer Color Clinic - you can ask for whatever volume of developer you want - i got 1/2 -- 20 Volume & 1/2 -- 40 Volume} . Now to make it so the 2 sides end up "done" at the same time...[like making a big dinner!]
I mixed up another small batch of Creme bleach with 40 Volume for the other side. Remember 40 Volume work twice as FAST as 20 Volume - - it is NOT twice as strong - it is all the same the only difference is "TIME"....so doing the other side with 40 Volume - makes it so both sides are at the same lightness at the same time - it was perfect !

This was also too close, and I took a DRY Q-Tip and wiped this one off on the fold....so it wouldn't leak. I used a bigger brush and had a harder time!

Again, see how thin the hair is for the slice? Remember that, thinness is perfectness in SLICES

Another slice to be made. . as my trip up the side of the head continues. Make my partings clean and straight its important

Another Slice of light . . .

Applying the bleach and 20 Volume . . . . .

Closing the 3 foils up and continue on . . .

As you go up the side - - see how the width of the slice narrows? ? The last one is not even 1 inch wide!

Refresh the bleach midway up by taking a small squirt of 20 Volume and mixing it in to the mixture

Be sure you keep the angle of each foil correct so that your foils sit like this and end up over
the eyeball, if your foils end up any other direction at all then something is wrong. Be sure to check
the eyeball, if your foils end up any other direction at all then something is wrong. Be sure to check
Now, remember do this in a warm room
>> When the foils are done and that is so individual, you will have to determine "how long" yourselves. >> Take the foils out, and rinse completely untill all traces of the bleach are gone....
>> Lightly shampoo with SLS-Free Shampoo -- Rinse -- towel dry hair....The method of
>> Apply an equalizer ( we have a new one on the way!) let set on hair for 5-50 minutes
>> Rinse & apply Detangler or THRIVEN or whatever your regimen is
I always apply THRIVEN after using Bleach, it is the single best conditioner and after-treatment in addition to our new Equalizer coming out. You never know you colored your hair when you follow up with THRIVEN.
*** Then Blow Dry

Well, this is your results . . . after 6 Foils - - - Creme Lightener + 20 Volume and 40 Volume and is called Slices of Light or BABY-LIGHTS KIT. I wanted you to see how to use foils that was easy and works with straight hair. This is not how you should apply foils with curly hair....the pattern would be wrong.
In my opinion ( remember this is just me) I don't like the stripey look, but if I was to blend the colors you would not see how the color in the foils came out. Now if you used various colors, and a couple more foils you would have the colors of someone named "ANNISTON" !
Here is the side I wanted you to see the "6" Slices . . . see the tiny one - - in the back which is why you do not need to do the back of your hair, it is taken care of with the front parting - - how perfect is that? ?!?
I did the same thing they do in all the big magazines. . . I did the blow dry all cool when I had the hair color I liked!
"Isn't it weird and cool all at the same time how much difference I made with just 6 foils! Its not highlights and KILLER CHEMIST says she is not exactly fond of this technique ( using just 1 color) either but I think it rocks . . ."
that's the good part about taste - - we all have it and its all 'different"
one can use multiple colors - -


FINAL VIEW of the look is pretty gorgeous. . . what do you think?
The 6 Foil Transition using Slices of Lights
Remember a BlowDry can change things more than a color, more than a shampoo


 Posts
Posts


