

Tint Back to Natural – 2 stage Process - STAGE 2
Base + Slices Technique
This will be my last “re-run”: repeating what I have already written, I just find this is not easy for me. Having 257 ‘Posts’ under my belt, I have found that I try to write as if I was talking to you, to try to make my words sound better
That’s part of the stumbling block for good Blogs I think. Everyone wants a great writer at the helm, but if that’s what you have then that is most likely their specialty. . .”WRITING”, not beauty, or skin, or sports, or guns or hair or whatever. So I feel if you want a great informative blog, authored by a specialist in ‘whatever’ category…such as hair, make-up, skin, guns, politics, most likely they are not a Pulitzer prize winning author, most likely they are like me – because their specialty is their focus, not writing. Having never spent any time learning to
 write properly, is only because I have been busy learning other things along life’s path, not because I didn’t care. My salon clientele used to come to me just to listen to me talk about everything I knew about hair, I’m passionate about everything I do, so I hoped that if I mimic that experience in writing, it would not come out too objectionable…but to have to repeat it all again?…errr grumble-grumble, terribly frustrating for me. It’s almost over.
 Thinking about the reasons this method is so successful for you, who want to go from blonde back to natural, or some morph of it, reminded me the reason clients like you like this method so much. You are used to the most high maintenance hair there is… a Bleach n Tone…it takes the most frequent touch-ups, toners & care. Then, to go from that to straight 1 color brown, is not interesting enough to most of you - so this intermediary version satisfies many of your urges and desires for fun and fascinating hair! This way you can plan your next color choices, some end up
 putting red-violet slices in the mix or copper even, which adds to that overall ‘fun and fascination’ !
 Lets Begin
Tools
- Towels
- Plastic clips
- Tail comb
- Cutting comb
- Old shirt/cape
- 3 Plastic or glass bowls
- Gloves
- 3 Tint brushes
- In-Depth – Wella Treatment

- Shampoo
- Detangler
- Liquid Hair Restructurizer
- Timer
- Selected 3 Colors & Developers

Formulations

- Wells Illumina 7/35+ 13 Volume
- Blondor Crème Bleach + 10 Volume ( only applied to the new growth -- NOT the lengths)
- Wella Illumina 8/38 + 15 Volume
PATCH TEST
1. Perform a preliminary PATCH test, 24 hours prior to the service. Proceed only if the test is negative. If you are an allergic person I would highly encourage this step. It needs to be done with every ‘new’ brand and product you apply to you head. For instance, If you use Renbow’s Colorissimo (permanent tube color) the decide to use the RenColor (permanent bottle color) for something else, yes the patch test needs to be run again. PATCH – SKIN.
STRAND TEST
2. Perform a Preliminary STRAND Test. This should always be done as soon as you get the color you are planning to use. It’s a test run….a vision of what it will be like when finished, don’t be too lazy or think you know what results will be. Part off ½-inch square strand of hair in the lower crown – underneath – (not at the very bottom). Use a foil to hold the strip of hair and apply a small mixture of the color. Check it at 15 minutes, then at 25. Note the timing down on a card. STRAND-HAIR.
3. Remove jewelry – apply cape or these great small capes we carry ......

Procedure

This is where you should start looking at the posted photos down the right side of this post, begin at the top and just glance at each one on the way down. Then read thru steps and compare to photos -- you are not given the capacity to line them up (with the words) – sorry.
Take “Before” “During” & “After” Photos (minimum 6), remember you can win the CRIB COLORIST AWARD, “if” you document your own hair color adventure. Hair Color needs to be from Killer Strands. Noting formula’s, techniques, trials & tribulations, ** what you learned new from Killer Strands Blog & the Killer Strands Group. Post the whole thing: story (minimum 1000 words) & pictures on a page in the group ( ask for help from T, Detour, Nik or myself if needed). When this is done YOU win the Crib Colorist award. It doesn’t need to be correct or special or anything, you just need to document it all for us to view, to win.
The PRIZE? ? ?

THE CRIB COLORIST AWARD which includes a gift from Killer Strands that includes:
- Hair Color Key
o Carbon Combs: 1 tail comb & 1 cutting comb
o 4 oz. Measuring cup
o Shampoo Sprayer for sink
o 2 Tint bowls
o 2 Tint brushes
o 2 Tubes FREE COLOR - whatever your brand is ! - 1. Part & Section hair is always the first step in all procedures & techniques. On this we will only be parting NOSE TO NECK > Part 2: Section-off the top
 which is the basis for all wonderful color work including ribbons, slices, the veil, almost every great technique. Sassoon does this differently than any other hair school, so pay attention. Part into even pie shapes or triangles on either side of the center part. PRACTICE THIS, because it needs to be perfect à EVEN à and not sloppy. Have you gotten your doll head yet? Get one; they have men, women + every length of hair. If enough of you get them I will take you through an elementary cutting class. Let me know.
 - 2. Fold your Foils, I’m trying to get a hold of foils I can carry for you, at a decent price. Remember a double ¼” fold at the top of one side.
- 3. Prepare the color formulations, be all ready to go before you actually mix them up, and remember the color is best when used immediately. For this we are using 7/35 + 13Volume Wella-Illumina {or use your own color formulation at this point}. Crème Bleach (most mild there is) + 10 Volume depending on the amount of lift needed. Last, Wella Illumina 8/38 - 15Volume * * * * RETURN TOPS TO ALL DEVEL
 OPERS * * * *. The idea here being to use 2 light brown colors to some thin slices on either side of the head/hair, to begin the re-introduction of darker colors to the hair and your vision.
 - 4. Put on Gloves, have comb, foils and bowls lined up and ready to go. Line up mirrors if your tackling this yourself. Its actually made to apply to yourself there is basically no work on the back side of the head!
- 5. Begin on one side, hold the section of hair and take your FIRST slice of hair a super-thin slice of hair à AT AN ANGLE -- ½ inch from the front with tail comb.
- 6. To “test” the proper angle of your section, you should stick a comb in the middle of the section back to the apex of the parting in the back.
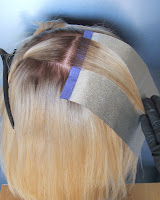
- 7. Press the foil down to the scalp, slip it under the slice of hair, lay the hair down, and paint on the Level 8/38 -- covering completely all the hairs. Starting
 with the lightest Color first, so there is not a dark stripe right at the front next to your face.
 - 8. Continue the next one leaving a ½ to ¾ inch of hair alone in between {this is very hard to say use your best judgment} some people have small heads and ¾” would be WAY too much, this all depends on the size of your head. Look to the photos to see how I did it on Molly’s head of hair. Spacing the foils according to the hair and head size.
- 9. Alternating here with Level 8/38 ., then bleach + 10V, then Wella Illumina 7/35, bleach & 10Vol up the one side till finished. Then up the other side till finished.
- 10. Process for 35 minutes, (this is a tough call remember when going the same color or darker – you want to add 10-15 minutes to the timing…..when going lighter you don’t) Here you are doing both at the same time! Its not a perfect world.

- 11. Rinse the hair with lukewarm water – thoroughly – in the sink with a spray hose contraption ( I will be carrying these soon as well)
- 12. Lightly shampoo with an SLS-FREE Shampoo, rinse again. Shake the excess water out.
- 13. Apply Killerstrands INTENSIVE After-color treatment to mainly hair that has been colored – massaging in. Leave on for 5-20 minutes – rinse. DO NOT SKIP THIS STEP, this brings the pH balance back to the hair and helps with conditioning, moisturizing, re-balancing and shine.
- 14. Towel dry, Spray with Soma SPRAY Detangler, your Detangler – Dry & Style
- 15. Clean-up and sanitation . . . . Putting combs (not clips), bowls (not tint brushes) through a dishwa
 sher cycle sanitizes them for your next go-round! For clips and Tint Brushes: clean and rinse with super hot water for 3-4 minutes to sanitize. For Killerstranders there is a spray disinfectant (I will carry soon) that is handy called MARVY spray disinfectant you can simply spray everything with. Cleanliness is next to Godliness and Hair OCDness !
 - 16. Jot down in your hair notebook what went down and how you would change it next time, don’t rely on your memory.
- 17. YOU ARE FINISHED- How did you do? Take photos – post in the GROUP, everyone is anxious to know how you did
Next time you would add more browns - different Levels and tones to add to depth and interest.


Killer Chemist


NICE!!!!!
ReplyDeleteIf you have curly hair, the kind that separates into distinct "spirals" or "chunks"...do you recommend using those natural separations as individual hi/low light ribbons, or do you think that looks too stagey?
I love it - the slices are a wonderful addition to make a hard transition (from blonde back to "natural") so much easier. It combines the best of the "light" look of the blonde, with the easier maintenance of the brunette, in a fun and interesting way. Thank you - "I" think this is my favorite demo so far - your writing and pictures are so clear! Thanks!!
ReplyDeleteUMMM....AWESOME DEMO AND ALL !!!! REALLY ITS GREAT...BUT I HAVE some questions
ReplyDelete.....firstly, i feel sooo sorry for molly the poor girls hair looks DRYYYYYYY and DAMMMMAAAGED how ocme it looks fried..girlfriend needs some thriven !!!!
.......Secondly, why was bleach/10vol used? her hair is already gwen stefani blonde !!!!!!!! ...any lighter is past the frozen butter stage........and u cant really see the effect just make it loook more damaged...Anyway i know stupid questions but im so confused....overally the effect is awesome....i wud put more brown coz weriedly/iinterestingly the brown sections look healthier and shinyier...more than the blonde ones yet its more processed ..loooool
anyone there?
Hi Molly's sister!
ReplyDeleteI'm sure KC may add more, but in the meantime....
Molly, regrettably, is a dollhead,and they use (see KC's comments in the previous posts about Molly) this acid stuff on it... so she doesn't have our ability to care for it! LOL. Yup - girl needs Thriven... but we have brains and know to use it on our hair! hee hee.
On the "why" for the peroxide - keep reading the blog...
http://killerstrands.blogspot.com/2008/03/white-stuff-is-right-stuff-permanent.html
is one post on why you need some peroxide to deposit color (regardless of whether you are already blonde or not). Search the blog for more on the topic - and don't forget to read the comments below the posts for LOTS of good info from KC to direct questions.
Just a humble opinion - but you can't actually judge how the color is going to affect REAL human hair (although Molly's was human at one time, it doesn't have the same care and handling while being "harvested, decolorized by the manufacturer, put on the doll head, and subsequently" up to this point, as hopefully ours does. At least, I'm assuming that if you are reading this far into the blog, you are treating your hair with lots of TLC... like Thriven! LOL.
So... you think you want to try this? I'm going to be using the tintback + ribbons myself... Looking for some other folks who are going to try it too!
I did, btw, transform my hair from looking like Mollys (bad past treatment by a hairdresser and my own ignorance) to pretty healthy stuff that is smoother and glossier than my skin... using Thriven... so you are on the right track if you are doing that already!
Hopefully you can jump over and join the group, too... lots of us over there to help out!
HI Betty,
ReplyDeleteNO, I wouldn't use this color selection for curly hair, and slices don't really work for curly hair, I guess I should have said that. Sorry.
Ribbons do.
not slices, someday we will go into that, need a break tho.
thanks
K/C
wow Molly told me she didn't have any sisters!
ReplyDeleteShe's a doll come on, lay off.
YOU do of course know that she began this whole adventure as a brunette. You are only supposed to be able to pull off 1 color
change with doll heads, she's been through quite a few now
The reason I used the bleach is because if you look at molly's hair she has BRASS/gold/yellow
in her lengths.
Bleach LIFTS the brass/yellow out. Some people have brass in their lengths!
Some don't.
Molly did.
I only left it in for about 5-8 minutes and it was only 10 volume.
Thanks Nik for the help...
much appreciated
KC
COOL Contest! That will be fun! I love this demo! You did such a great job. Thanks for all your efforts to teach us KC!
ReplyDeleteT
Thanx for the replies guys ...loool nik i wasnt refering to why DEVELOPER was used...i was refering to why BLEACH was used lol which KC explained it eloquently (thank you) ...
ReplyDeletelol yes already read the blog (since oct)and i am a member of the groups DUH (being anonymous for fun) !
LOL
(wasnt dolly molly's sister too....and she did that "star/highlight with beigne toner? LOL)
Thanks for understanding - I'm sometimes zooming along too fast! LOL. I remember "Ronnie Ribbons" - whose hair I also liked.
ReplyDeleteGlad to hear you a group member - Hee hee... it sounds like you are having fun with this!!!
Nik